| Materials | Tools | |||
|
|


Swan Cement supply a range of cement products, in different package sizes, to cater for a variety of DIY projects.
We have listed our quality products that may best suit your concreting needs. For estimating your requirements please refer to our Ready Reckoner or try our calculator located in the side panel.
Please see below for our step-by-step guide for laying a concrete slab; alternatively you can download our printable copy here:
![]()
-
1
Concrete requirements
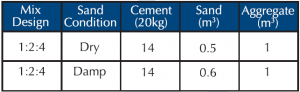
Calculate out the volume of your slab by multiplying the slab’s length x width x depth. This will give you a quantity in m3. Using the chart below you can then work out the materials required.
Mix Design for slab floors, driveways and paths:-
1 part cement : 2 parts sand : 4 parts coarse aggregate
(Use only concrete sand to avoid cracking)
Materials required for making 1m3 of concrete:
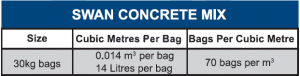
Cement to be used should be Swan Cement Type GP which comes in grey or cream.
For small jobs use Swan General Purpose Concrete pack. Swan’s pre-blended range already contains cement, sand and aggregate.
-
2
Setting Out
Whether you are laying a floor slab or a concrete driveway or footpath, the basic procedure is the same. The main difference lies in the thickness of the slab.
Firstly locate and lay out the areas to be concreted using stringline. Remove the topsoil to about 100mm below the desired finishing level. Compact and level the whole area to be concreted, allowing for a slight slope away from buildings for drainage purposes.
Placing your 100mm x 50mm timbers for the formwork side rails, drive wooden stakes firmly into the ground at no more than 1.2m apart. The rails should then be securely nailed to the stakes. Extra stakes need to be placed at every joint in the rails and at corners. Level the formwork carefully using your straight edge and spirit level.
A one-piece slab should be no more than 3 metres in any direction; nor should the length exceed twice the width. If
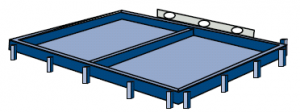 you plan to exceed these dimensions, divide your slab into equal sections and construct a joint between them of about 12mm. Support these joints while compacting the concrete. These joint timbers can be removed once the concrete has hardened.
 -
3
Mixing the Concrete
Concrete needs to be mixed on a clean hard surface, such as an existing concrete slab or on a piece of board. You can also use a cement mixer if available. Firstly place your
 measured quantity of sand and add the correct proportion of cement. Mix these materials thoroughly until the colour is consistent.
Add in the coarse aggregate, mix all three ingredients thoroughly again until the colour is consistent. Finally add your measured quantity of water, sprinkle the water slowly over the mix, stopping frequently to turn over the mix until the mix is consistent in colour and texture. Do not add too much water, you do not want your mix too sloppy. Too much water means a weak concrete. The water should weigh roughly half of that of the cement added.
A concrete mix of 1 part cement : 2 parts sand : 4 parts coarse aggregate should be used for a concrete slab.
-
4
Placing the Concrete
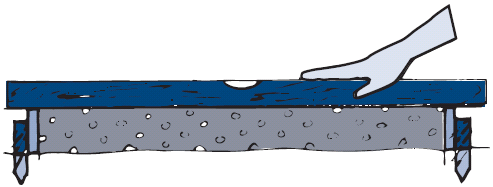
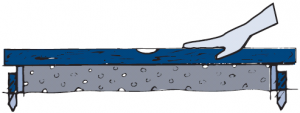
Concrete must be placed within half an hour of mixing. Place your concrete into your formwork; work the concrete into awkward places and corners using a shovel or trowel. Place enough concrete to overfill the formwork slightly. Use a straight edge to spread the excess concrete using a sawing motion, levelling the concrete off to the formwork. Using a wooden float, compact and smooth the surface of the concrete to achieve a consistent mortar finish, this will ensure the concrete is well compacted.
When the bleed water has left the surface and the concrete has started to stiffen, it is time to apply the r e q u i r e d finish.
-
5
Curing
After the finish has been applied it is recommended that the surface be kept damp for up to 7 days after which it can be allowed to fully dry out.
-
6
Finishes
There is no limit to the finishes that can be given to concrete. A few are explained below:
Trowelled – Using a steel trowel gently work the surface back and forth to create a smooth finish.
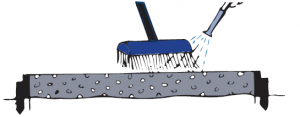
Brushed – Using a hard broom you can obtain a deep texture by brushing the concrete while it is still plastic. A softer broom can be used for a less coarse look.
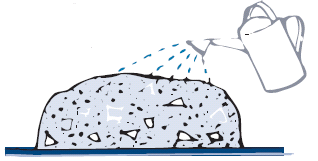
Exposed Stone – Start by applying a soft brushed finish, then when the concrete has hardened sufficiently to prevent the stone particles being dislodged, use a combination of brushing and washing with a hose until the stones are slightly exposed and the surplus slurry is washed away.